Happy Holidays!

It’s been a while! 2014 was a crazy one! I moved to CA and am starting everything from scratch. I haven’t been doing nails at all! Terrible– I know! But I finally got around to doing it just in time for Christmas.

image


image


image


If you noticed, my nails are short! My claws have been filed down to little shorties since June! It’s crazy but with my new job, it’s just impossible to keep my beautiful class intact.

This design was created using CalGel and Trump Gel. This nail set is a natural nail gel overlay. Gold & clear iridescent glitters with different sized gold hexagon Splash! brand holograms.

I’ll try to do better about doing nails & posting! Thanks for visiting! Happy Holidays & remember to keep your claws modish!

Xoxo,

Stacia

Get Rockin

Summer is just about wrapping up and fall is creeping in. Soon, it’ll be winter. Brace yourselves for edgier fashion & nail designs.

This trendy fashion guru doll came in a requested we do something edgy.

We did a white base, with black outline and gold studs. To push it further on the edge, she wanted to put some lips and mouth action. We accented the mouth with a little Swarovski tooth bling.

The whole set was done using Trump Gel over her natural nails.

20130905-141749.jpg

20130905-141802.jpg

20130905-141755.jpg

I’m so excited to see all the badass designs that’ll be popping up on the scene in the coming season!

Thanks for visiting, and remember to keep your claws modish!

Xoxo,
Stacia

Black Summer

It’s still summer and fashion trends are all about the colors and bright. Same goes for nail trends. Yet, black nails still seem to be a trend that defies seasons.

I’ve been wanting to try out black nails for a while, and even though it is summer, I decided to give it a go.

Some of my nails broke and I didn’t want to extend them, so I have some mini claws. Since the stiletto nails are more fragile, I decided to lay a layer of Bio Sculpture gel first for a little strength. Then I used Trump Gel for the rest of the layers. I topped it with soak off hard gel by Trump Gel.

It is a French, but at more of a diagonal “V” shape rather than a curve. I used gold holograms by Eriko Nails to line underneath the French. Instead of directly under the line, I spaced the holograms down a little further. For a few of the nails (more specifically, the mini claws), instead if lining with holograms, I put random neon holograms, by Splash, on the black French.

20130721-190401.jpg

20130721-190407.jpg

20130721-190412.jpg

I think this design would also be cute even in white or a nude.

Thanks for visiting, & remember to keep your claws modish!

Xoxo,
Stacia

Hearts & Claws

Lately everyone has been wanting to rock the stiletto nails– more than ever! Unfortunately, you need a a certain length to accomplish this nail shape. Luckily, there are extensions! Though not as strong as your natural nail, extensions can be a quick fix to obtaining the desired nail length and shape. How you care for it will determine how long you can rock them.

I prefer to extend nails via sculpture forms. I don’t like using plastic tips because they aren’t as strong. Tips are applied with glue and really have no hold. But sculptured nails are formed to your free edge. They are more natural looking and fit better.

Alongside with the stiletto nails trend, the heart French design has been in big demand. I have done several variations of it in the past month. Here are some of the June – July extention claw designs:

20130718-125652.jpg

20130718-125658.jpg This was done for one of my besties. She’s a new mommy! These are gel tip extensions. I used the soak-off hard gel by Trump Gel for the tip extension. Neon pink is soft gel by Trump Gel and the leopard print was drawn using their art gel. Art gel has a less runny consistency and is great for drawing fine lines with. The pigment also seems to be more vivid. The gold glitter and holograms are from Eriko Nails.

20130718-130020.jpg These are actually a natural nail overlay. She has finally graduated acrylic nails and has patiently grown out her natural nails. She had tips on when she first came in! She came up with the design herself. We used Trump Gel for everything.

20130718-130455.jpg Ms. T! She is AMAZING! I love her! She is the sweetest client and I have known her for a decade. She has been a client of mine when I worked retail. She normal gets regular manicures with polish and always on her natural nail. But this time, her gorgeous daughter convinced her to get extensions and do the gel. Ms. T is a fan of French nails, I personally love it on her. So we did a simple French with glitter line. We added leopard print and hologram nails for accent. These are sculptured nail extensions. Again, Trump Gel was used for everything.

20130718-130818.jpg The amazing daughter of Ms. T! She’s a sweet and gorgeous girl! Just stunning and so much fun. She wanted “vampirial” nails, as her bf calls them. I have her sculptured extensions using the Tump Gel hard gel. Her nails were very short. I wish I had a “before” picture! Probably about 1-1.5mm of fee edge. Which is just enough for sculpt.

20130718-131118.jpg Just for fun! Mother & Daughter.

20130718-131158.jpg For a hard working gal, Ms. A. Se works 2 jobs and has no day off! Hats off to her! She’s going in vacation to Atlanta to visit her cousin. And she needs her nail game on point! We did sculpture gel nails. She has an idea in mind for the base design of the nails, and I just added the stones and studs according to myself. Luckily, she loved it! I used hard gel by Trump Gel for the sculpture and for the white.

20130718-131457.jpg Finally, my own nails. These are my natural nails. I am in the midst if growing them out. I cut them really short about 2-3 months ago. And I’ve been trimming and growing. Getting there. I just thought if try a fun design out. Kind of vampire inspired, I suppose.

Claws are still in! Just be sure you treat your nails as jewels and not tools. ESPECIALLY if you are wearing nail extensions. They break more easily and are fragile. Be sure you use your knuckles to press buttons, and coins to scratch off things like tape or goo, and also coins for opening aluminum cans.

Thanks for visiting! And remember to keep your claws modish!

Xoxo,
Stacia

Disney Fever

Summer is here. And summer brings summer vacations. Disneyland and Disney World are still huge destination spots for vacationers.

It seems to me that Disney is picking up fame with increasing speed. It’s basically the new Hello Kitty.

I have several clients who are obsessed with Disney. And, of course, are balls to the walls about Disneyland / Disney World. So, when they told me they are going to take a trip and wanted Disney- themed nails, I had to oblige.

Most people ask for the typical Minnie Mouse design. The red with white polka dots. And also for the Minnie & Mickey Mouse combo, wih black background and silhouettes of Mickey.

20130701-041037.jpg

20130701-041046.jpg Then, one day, I got asked to make Mickey-Mouse-shaped balloons! How awesome of an idea is that? Super colorful and super fun!

20130701-041327.jpg I hand painted all the balloons using Trump Gel’s art gel. I also had the pleasure of creating 3D parts that were icons of Minnie & Mickey Mouse.

20130701-041821.jpg

20130701-041829.jpg But the most unique one, was Disney Princess theme. It’s not as obvious Disney-themed as the other designs, but it came out really cute. And really Disney Princess-y.

20130701-041555.jpg

All designs were created using Trump Gel…!

Shining Heart

Over the past few days, I have gotten requests for the same nail art at the salon by numerous people.

It’s a very cool summer-y look and the colors can work for Fourth of July. Maybe that’s the reason for its sudden popularity.

It’s a cute way to jazz up a simple design. These were all done with just regular polish.

20130630-123446.jpg I used O.P.I. white for the base, then painted just the tips with China Glaze blue glitter (I forgot the name of the color. But I am tempted to say it was Meteor Shower). I drew the heart with red acrylic paint then filled it in with Eriko Nails red holograms.

20130630-123745.jpg Again, I used O.P.I. white for the base with the hearts. The red is O.P.I. “Big Apple Red” and silver is from China Glaze. The hearts were created the same way.

O.P.I. white & “Big Apple Red”.

This design can have the inverted colors using white or silver holograms for the heart with a red base and still really pop. Other color combos would be fun, too.

I am used to doing pedicures with art using just polish, but it’s rare I do manicures with polish art, so this was fun. I usually work mostly with gels. But it’s nice to work with polish on occasion. Really tests your skills. (Though this one wasn’t very hard to do at all).

Thanks for visiting, and remember to keep your claws modish!

Xoxo,
Stacia

Pop Nails

After, literally, hours of looking at and debating on designs, I decided on my first nail set of 2013. Whew.

Sometimes, I can easily get an idea on a design from inspiration from an outfit, or client’s nails, the weather, season, or even just a color.
Other times, it takes me forever to decide on something. Often times, this happens because I want to do everything, but I own limited colors of gels and/or nail art accessories.

This time, I had the latter and had a huge nailist’s block and couldn’t think if an exact design.

My mother just brought me back 5 new nail magazines from Japan and bunch of cool new gels, accessories, and holograms & glitters.
I think I was so excited about all my new toys that it made it harder for me to make a decision.

I ended up getting my inspiration from one of the new magazines, “Super Gel Nail, Design Maniax”:

20130113-031426.jpg

20130113-031613.jpg

I had to sub the yellow for something else because I haven’t gotten myself any yellow gel yet. Instead, I went with matte white with sprinkles of neon hologram. And instead of the star on the pink polka dot nails, I added on single stone. This is what I came up with:

20130113-033018.jpg

20130113-031809.jpg

20130113-031824.jpg

20130113-031833.jpg

20130113-031936.jpg These were done using CalGel (CG04; 18 mix 06), Trump Gel (Base; Hard top), and Naility Gel (matte white). The holograms come in one container with mix of neons and sheer neon flakes, and are by Splash.
I drew the hearts myself. They were done using gel– just like the polka dots.
And, of course, now that my nails are longer, I had to point them and shape stiletto nails. The claws are back!

My first nail set of 2013 are stiletto pop art nails! Happy New Year (again), y’all!

Thanks for visiting and remember to keep your claws modish!

Xoxo,
Stacia

“It’s beginning to look a lot like Christmas…”

“It’s beginning to look a lot like Christ-maaaaas~”

I have already been getting several holiday nail requests, since the gel nails last for such a long time. 95% of my clients wear gel nails, and they have been coming in to me since the beginning of the month to get their holiday nails started. As mentioned in the previous post, gel nails can last for 4-6 weeks without fills, and if filled, even longer. Therefore, I have done some designs that are all-out-Christmas for clients who plan to wear it for the rest of the year, and some simpler designs for those who plan to fill.

I only did a few holiday designs last year, and so I am excited that I have been getting more original holiday design requests this year. I am pumped to do even more than designs as it becomes closer to Christmas!

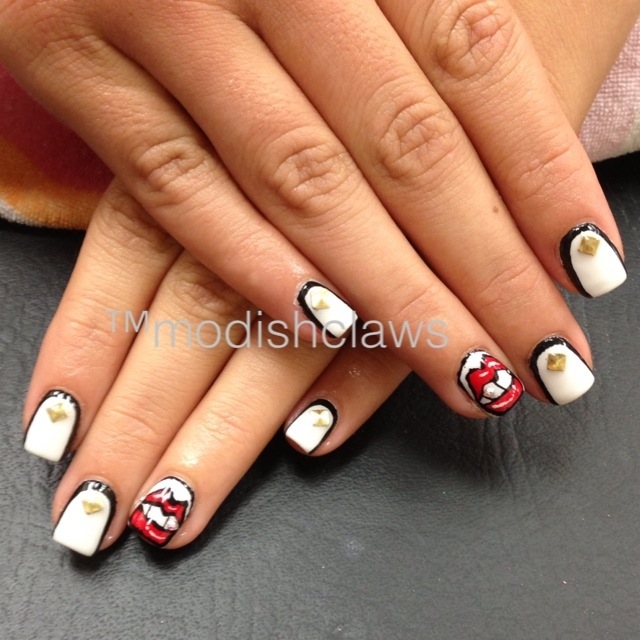
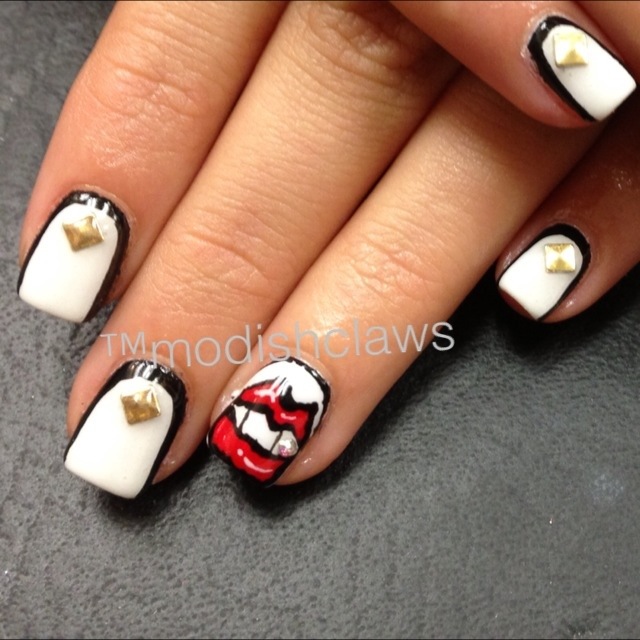
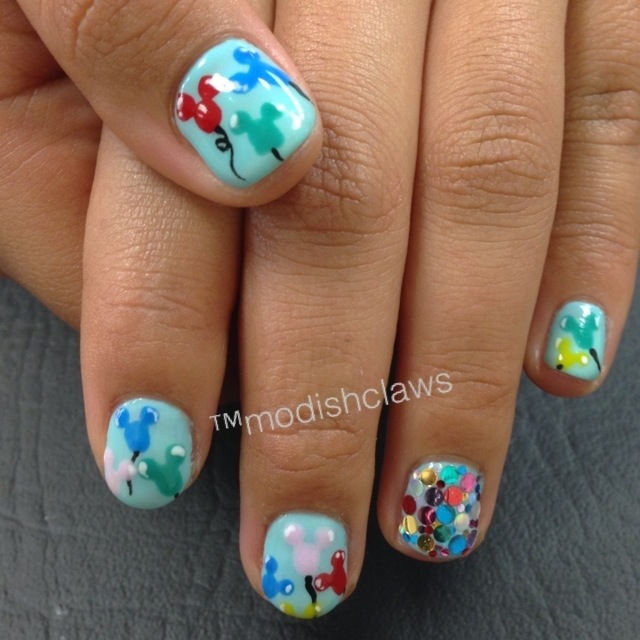
One thing I love about holiday designs is the many different options you have. It seems repetitive because its the same color schemes: white, blue, red, green, silver, and gold. And everyone wants snowflakes, stars, and poinsettias. However, when you think about it, you CAN get creative. The options are endless: Starry night, winter wonderland, Santa & the Northpole, glamour & glitz, argyle, plaid, holiday present, Disney Christmas, Hanukkah, and the list goes on. Have a go with your holiday nail designs! Don’t limit yourself to the usual suspects– think outside the box and get creative.

Here are some holiday nails from last year:

20121123-204302.jpg This pedicure is a simple gradation done with polish. Glitzy red glitter.

20121123-204439.jpg (Sorry it’s so blurry). Some Christmas-y 3D pieces I made with acrylic powder.

20121123-204541.jpg This one is actually a fill done over a natural nail overlay. She had a pinkish colored glitter gradation originally, and I added some goldfish glitter, and some red and gold holograms to make it more holiday. I used CalGel for this gel nailset.

20121123-205049.jpg 
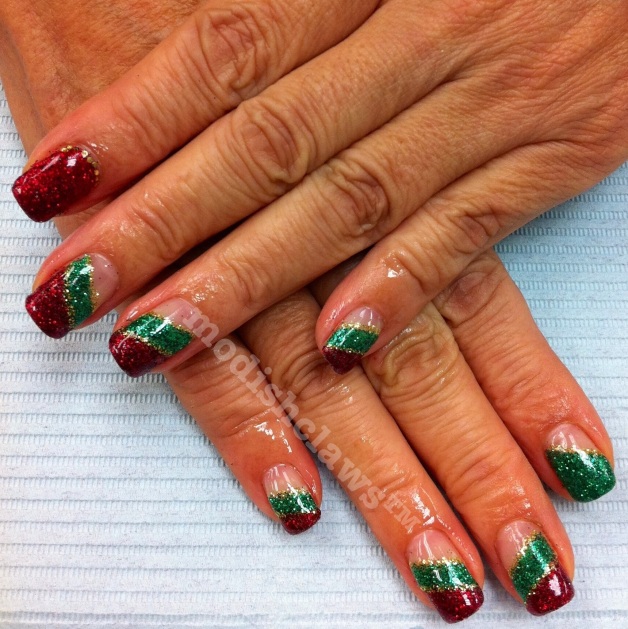
This one is also a fill over a natural nail gel overlay done using CalGel. She wanted to go “super Christmas” with her nails. This one was done 2.5 weeks before Christmas. This is one of my favorites. It is so glitzy and festive.

20121123-205716.jpg A holiday pedicure done using polish. Dark red color with silver glitter over, and some snowflake stickers.

20121123-205954.jpg

20121123-210017.jpg A natural nail gel overlay using CalGel. This design is very sentimental for me. I “inherited” this client, Ms. C, from my mentor & her former nail tech. In fact, her first nail tech was my nail academy teacher. I was so honored to be her new technician, since they are both amazing technicians and superior artists. This was my very first nailset with Ms. C. She never has an idea in mind, and she does not bring any designs, nor pick one out of the salon’s design books, and I am lucky if she gives me a hint on what color schemes she wants. I found this design idea from one of the iPhone nail apps, called Girls Pic. I did a simple glitter gradation, then I hand painted the design and used silver ab holograms to accent the design. Mrs. C is a very inspiring woman. 86– going on 87 and she is still so full of life. She always gives me life advice, and she is always dressed impeccably, from her hair to nails, clothes to accessories. Wonderful woman and client. She always challenges me as a nailist to creative original designs.

Stayed tuned for part 2 of this blog: This year’s designs. Coming soon.

Thanks for visiting, and remember to keep your claws modish!

Xoxo,
Stacia

Hand-y Work

One of my favorite things about doing nails is the flat nail art. I love being inspired by people, places, things, and events. But, I have noticed that with the creation of nail stamps and stickers, there are less hand drawn nail art. Though I love the convenience and accuracy of the stamps and stickers, it is sad to see the efforts of hand drawn art decline. I have even noticed many are now comparing the perfection of stamps and stickers to the work of hand drawn nail art–which are far less perfect next to machine-made graphics.

I actually can’t draw well on paper, but when it comes to nails, somehow I draw out more talent. No matter your skill level, I think it is important to practice your drawings. Practice makes perfect. While stickers and stamps are great, don’t forget about the art of hand-drawn nail art.

That’s why, this post is a dedication to hand-drawn nail art. Enjoy!
20120919-220726.jpg Natural nail overlay with CalGel. I drew the lines. This was down for my client during the holidays.
20120919-220743.jpg This is a natural nail overlay using CalGel, again. It is an orange color gradation and I drew the monarch butterfly design.
20120919-220754.jpg Another CalGel natural nail overlay. This is my nails, I did for myself several months back. Sugar skulls! (Sorry the lighting sucks).
20120919-220919.jpg Natural nail overlay using Trump Gel. Deep French done in blue. We went for a fun and funky goldfish // koi design. (Sorry the photo isn’t that great).
20120919-220938.jpg Another natural nail overlay with Trump Gel. Coral deep French with sunflower design. She wanted me to use a color matching her ring.
20120919-234126.jpg This is just regular polish. I used a bunch of China Glaze & O.P.I. glitter polishes . I drew the mermaid, and used Eriko holograms for the “bubbles.”
20120919-234141.jpg I saw this neat design on the app, “Girl’s Pic” and wanted to try it out. This is me, practicing. I used only polish.
20120919-234201.jpg This is a natural nail overlay using CalGel. It is a color gradation (#46) and Purnelle glitter (#001) all over. She is a tourist visiting from Japan, and wanted a “Hawaii themed” design.
20120919-234153.jpg This pedi was done just yesterday on one of my clients, using just polish. I drew the hearts and the ribbons.

20120920-000107.jpg Pedicure done with polish. Nose done with acrylic for 3D. I have a serious panda obsession, and so I did this on my own toes. My regular (pictured here), saw it and wanted me to put them on her toes, too!

I hope this has inspired you all to try out and to practice your hand drawn flat nail art. It is actually a lot of fun, and so much more rewarding. Good luck, and have fun! Email me some of your best, if you like!

Thanks for visiting, and remember to keep your claws modish!

Xoxo,
Stacia