2015 Nail Game Strong

Happy New Year! Ready for 2015! New goals & inspirations.

My client of about 2.5 yrs now (and now one of my good friends) has always done the same nail design since coming to see me for the first time in Hawaii. She always did the iridescent silver glitter gradation. A few times, we used gold, or this past Christmas we used some red, but silver glitter was her favorite & regular. But today…our first new set of the year, she decided to change up her nail M.O. and do something different.
She chose a very chic design with simple colors & clean lines.

It had been a while for me to actually do some nail art, and it was so much fun! I love the design on her– more importantly, she loves it!

2015/01/img_2507-0.jpg
Her usual “mermaid glitter” is just going to have to take a vacay for now.

2015/01/img_2508-0.jpg
Natural nail gel overlay: CalGel #46 & #04

2015/01/img_2509-0.jpg

2015/01/img_2511-0.jpg
The line down the middle going up from the tip of the triangle at the base of the nail gives the illusion of lengthened nails.

2015/01/img_2510-0.jpg
I am so excited we got to try something new. It’s not too crazy of a design; simple, but not boring. Very chic!

If you’re a creature of habit– especially with nail designs, why not change it up a bit and welcome 2015 with fresh nails!

Thanks for visiting, and remember to keep your claws modish!

Xoxo,
Stacia

P.S. If you’re in need of amazing mermaid jewelry to accompany your modish claws, check out her shop: Misha Hawaii on Etsy.
Instagram: mishahawaii
You’ll love it! ♡

2015/01/img_2517.jpg

☆To view a collection of my work over the past few years check out #sbaeknails on Instagram

Alien Attacks

Just before I moved to the Bay Area in February, I had one of my former co-workers at the nail salon in Hawaii treat me by doing my nails for me. This was the last time I had serious claws. We went all out!

I had selected several nail designs I liked, and used them as inspiration. I’m really into aliens and super natural. I think alien shapes and images make for cool designs– clothes or nails. Eyes & Evil Eyes I am obsessed with! I even have an evil eye bracelet tattooed on my wrist, I have Evil Eye jewelry, & I’m always thinking about what “eye” things I can get. I’m also totally & beyond into triangles. They are definitely my favorite shape. Gold is my favorite metal color, and I just loved the pink & purple colors of the 3D cone shaped stones. They were perfect with monochrome color scheme I went with.
Shadé did such an amazing job on my nails!

/home/wpcom/public_html/wp-content/blogs.dir/a86/40489537/files/2014/12/img_2378.jpg

/home/wpcom/public_html/wp-content/blogs.dir/a86/40489537/files/2014/12/img_2381.jpg

/home/wpcom/public_html/wp-content/blogs.dir/a86/40489537/files/2014/12/img_2384.jpg

This nail set was a natural nail overlay using CalGel and Trump Gel.

These nails don’t necessarily have an obvious theme, except monochrome, lines & outlines. Don’t be afraid to mix-and-match and flirt with the “weird”.

Thanks for visiting, & remember to keep your claws modish.

Xoxo,
Stacia

Happy Holidays!

It’s been a while! 2014 was a crazy one! I moved to CA and am starting everything from scratch. I haven’t been doing nails at all! Terrible– I know! But I finally got around to doing it just in time for Christmas.

image


image


image


If you noticed, my nails are short! My claws have been filed down to little shorties since June! It’s crazy but with my new job, it’s just impossible to keep my beautiful class intact.

This design was created using CalGel and Trump Gel. This nail set is a natural nail gel overlay. Gold & clear iridescent glitters with different sized gold hexagon Splash! brand holograms.

I’ll try to do better about doing nails & posting! Thanks for visiting! Happy Holidays & remember to keep your claws modish!

Xoxo,

Stacia

Get Rockin

Summer is just about wrapping up and fall is creeping in. Soon, it’ll be winter. Brace yourselves for edgier fashion & nail designs.

This trendy fashion guru doll came in a requested we do something edgy.

We did a white base, with black outline and gold studs. To push it further on the edge, she wanted to put some lips and mouth action. We accented the mouth with a little Swarovski tooth bling.

The whole set was done using Trump Gel over her natural nails.

20130905-141749.jpg

20130905-141802.jpg

20130905-141755.jpg

I’m so excited to see all the badass designs that’ll be popping up on the scene in the coming season!

Thanks for visiting, and remember to keep your claws modish!

Xoxo,
Stacia

Disney Fever

Summer is here. And summer brings summer vacations. Disneyland and Disney World are still huge destination spots for vacationers.

It seems to me that Disney is picking up fame with increasing speed. It’s basically the new Hello Kitty.

I have several clients who are obsessed with Disney. And, of course, are balls to the walls about Disneyland / Disney World. So, when they told me they are going to take a trip and wanted Disney- themed nails, I had to oblige.

Most people ask for the typical Minnie Mouse design. The red with white polka dots. And also for the Minnie & Mickey Mouse combo, wih black background and silhouettes of Mickey.

20130701-041037.jpg

20130701-041046.jpg Then, one day, I got asked to make Mickey-Mouse-shaped balloons! How awesome of an idea is that? Super colorful and super fun!

20130701-041327.jpg I hand painted all the balloons using Trump Gel’s art gel. I also had the pleasure of creating 3D parts that were icons of Minnie & Mickey Mouse.

20130701-041821.jpg

20130701-041829.jpg But the most unique one, was Disney Princess theme. It’s not as obvious Disney-themed as the other designs, but it came out really cute. And really Disney Princess-y.

20130701-041555.jpg

All designs were created using Trump Gel…!

Camouflaged

It’s been a long while. I’m sorry. Things have been really crazy.

Lots of cool fashion trends this spring/summer. And camo is still in! So, I decided to take this trend onto my nails! I got the inspiration from one of my outfits.

20130627-040244.jpg

20130627-040229.jpg The juxtaposition of tough camo with girly pink. Accented with gold accessories.

20130627-040538.jpg

20130627-040544.jpg

20130627-040550.jpg This is a natural nail over-lay using Trump Gel. Hot pink with camo. Gold accent studs & holograms heart. Blinged out skull charm to give it a girly-edgy look.

It’s a quick post, but that’s all I have time for right now. I’ll try to be more consistent again!

Thanks for visiting, and remember to keep your claws modish!

Xoxo,
Stacia

Sister Act

It’s been a really long while since my last post. I’m so sorry. It’s been a crazy end of the month, as in sure it has been for everyone.

Anyway, today, I had the pleasure of doing two nail sets back-to-back, for two very gorgeous & special sisters!

One of my besties is back from SF to visit again, and today I did her nails and her not-so-little-anymore little sister’s nails also. Last time she came, I did the Dripping Hearts design.
Today…well…she was slightly more ADD. But it turned out super fun and really cool!

Her sister planned it out more and had an underlying color scheme: blue, gold, black & white. Mega edgy yet glitzy.

I had so much fun with these girls. And it’s great when I have so much freedom with the art.

They both gave me a quick sketch of what they were thinking and then we worked around it. Making some changes along the way, too.

20121226-225058.jpg Top: Baby sis // Bottom: Big sis

20121226-225249.jpg
Little Sis: Trump Gel & CalGel. Designs done with acrylic paint. Drips, holograms, glitter, stripes, & cheetah/leopard print!!

20121226-225455.jpg
Big Sis: Trump Gel & CalGel. Coral, red, white, black, glitter, hologram, cross, polka dots, stripes, & cheetah/leopard.

Thank you for coming in, ladies!! I had tons of fun!!

I will do my best to be better about posting again. Thanks for being patient.
Thanks for visiting, and remember to keep your claws modish!

Xoxo,
Stacia

Dripping Hearts

So…my “special client” came in yesterday and got her nails diiiiiiid. After all the sketches, you might be wondering, “Which sketch / nail design did she choose?” Well…the wait is over!

She picked the very first sketch I did with the dripping design and the hearts!!
ヾ(@⌒ー⌒@)ノ

Since we want it to last, I gave her gel nails. We used CalGel. I did a natural nail overlay on her, except her left hand ring finger. I put a tip extension on that nail to give it a little more length.

She wanted the shape to be more of a point– stiletto nails. We were concerned that they may be too short, but they turned out alright. Her nails were just long enough to create a nice point. I have noticed that the stiletto nails are becoming more and more popular in the U.S. it has been around in Japan for a while now, but since Lady Gaga and Rihanna, I have been seeing it make an appearance and become a request much more now. I guess fashion is cyclical. Remember waaaaaaay back in the days?! I swear some grannies still rock the pointed nails!

Stiletto nails are awesome, but a few tips to remember if you are planning to rock them:

  • Be very careful when you are filing to shape them. Make sure you are careful not to saw your nails– always file left-to-right // right-to-left. File slowly when you get to the stress point area. That is the the halfway point of your whole nail. Where the skin and nail meets on the side. You can weaken the nail and cause cracking if you file top roughly, or “saw” your nails.
  • Do NOT treat your nails as tools; treat them like jewels! Your nails are not meant to do hardwork, so pamper them. Use your knuckles to press buttons (i.e. elevator buttons, microwave buttons, seatbelt buttons, etc.), and use the pads of your fingertips to type, lift zippers, button shorts, etc. Unlike the square shape, they are not as strong in shape.
  • If you are going to do gel nails, make sure you file even more narrow than you like, because the gel will expand the nails. File a sharper point if you are using gel, because when you cap the edge, it will slightly round out and become more blunt.
  • The design is very simple as far as concept and color. I used black (#04; no extra pigment) and white (#01) in the gel. The glitter is a magenta // dark pink color by Eriko (sorry, I forgot to take a look at the number). I drew and payed out the dripping design initially with acrylic paint, then went over it with the gel to give it more dimension and shine of color. I used two “Chanel” inspired logo holograms: the middle finger on the right hand and ring finger on the left hand. I also threw on some small gold holograms by Eriko on the glitter nails.

    This design is fairly easy to do, and it was SO much fun! I am so happy I got to work on her nails. I love having so much freedom and creativity. Such a beautiful girl with a beautiful soul. I hope you all enjoy them, as well!

    20120920-034428.jpg

    20120920-034437.jpg

    20120920-034443.jpg

    20120920-034454.jpg My trusty gel brushes. THE best.

    So, what do you guys think? Did we pick a good nail design? How do you like it?

    Thanks for visiting, and remember to keep your claws modish!

    Xoxo,
    Stacia

    Hand-y Work

    One of my favorite things about doing nails is the flat nail art. I love being inspired by people, places, things, and events. But, I have noticed that with the creation of nail stamps and stickers, there are less hand drawn nail art. Though I love the convenience and accuracy of the stamps and stickers, it is sad to see the efforts of hand drawn art decline. I have even noticed many are now comparing the perfection of stamps and stickers to the work of hand drawn nail art–which are far less perfect next to machine-made graphics.

    I actually can’t draw well on paper, but when it comes to nails, somehow I draw out more talent. No matter your skill level, I think it is important to practice your drawings. Practice makes perfect. While stickers and stamps are great, don’t forget about the art of hand-drawn nail art.

    That’s why, this post is a dedication to hand-drawn nail art. Enjoy!
    20120919-220726.jpg Natural nail overlay with CalGel. I drew the lines. This was down for my client during the holidays.
    20120919-220743.jpg This is a natural nail overlay using CalGel, again. It is an orange color gradation and I drew the monarch butterfly design.
    20120919-220754.jpg Another CalGel natural nail overlay. This is my nails, I did for myself several months back. Sugar skulls! (Sorry the lighting sucks).
    20120919-220919.jpg Natural nail overlay using Trump Gel. Deep French done in blue. We went for a fun and funky goldfish // koi design. (Sorry the photo isn’t that great).
    20120919-220938.jpg Another natural nail overlay with Trump Gel. Coral deep French with sunflower design. She wanted me to use a color matching her ring.
    20120919-234126.jpg This is just regular polish. I used a bunch of China Glaze & O.P.I. glitter polishes . I drew the mermaid, and used Eriko holograms for the “bubbles.”
    20120919-234141.jpg I saw this neat design on the app, “Girl’s Pic” and wanted to try it out. This is me, practicing. I used only polish.
    20120919-234201.jpg This is a natural nail overlay using CalGel. It is a color gradation (#46) and Purnelle glitter (#001) all over. She is a tourist visiting from Japan, and wanted a “Hawaii themed” design.
    20120919-234153.jpg This pedi was done just yesterday on one of my clients, using just polish. I drew the hearts and the ribbons.

    20120920-000107.jpg Pedicure done with polish. Nose done with acrylic for 3D. I have a serious panda obsession, and so I did this on my own toes. My regular (pictured here), saw it and wanted me to put them on her toes, too!

    I hope this has inspired you all to try out and to practice your hand drawn flat nail art. It is actually a lot of fun, and so much more rewarding. Good luck, and have fun! Email me some of your best, if you like!

    Thanks for visiting, and remember to keep your claws modish!

    Xoxo,
    Stacia

    Bling On!

    The season for glitter, sequin, and all things blingy is just starting to come through. Buuuuttt…unlike fashion, blinged out nails are always in. Always.

    Whether it is a trip to Vegas, a birthday celebration, a wedding, or just because…well…you love bling, glitzy, shiny, and sparkly nails are the perfect accessory.

    Personally, I love all things shiny. Whether it be stones, sequin, glitter, or holograms, I just need to have it. Glitz is my addiction. Pair that with my obsession with nails, and I might as well be a serious junkie. So, when I meet clients who love shiny things as much as I do, I get beyond excited.

    Stones and– especially charms, can tend to become a challenge as far as getting them to stay on. It can be an even more difficult task when you are using regular polish instead of soft or hard gel. Here are my tips and methods for applying and keeping stones and charms on using polish and glue:

    1. Apply top coat over the second coat of polish. You can use base coat if you have multiple stones to place and want to move them around. Base coat seems to slide the stones or holograms with more ease then top coat.
    2. Place your stones/charms/holograms where you like. Once you are sure of placement, press down firmly.
    3. Apply a coat of nail glue over of and around the edges of the deco piece.
    4. Let dry and apply top coat. If you are worried, apply a second coat of glue to give yourself a peace of mind.
    5. If you really want to upkeep and ensure that your bling stays intact, apply top coat once a week.

    When dealing with gels, your bling tends to have a longer lifespan. However, it can be tricky, because the application of gels can change the shape and look of the stone. Here are some tips for applying your bling using gels:

    1. Apply a thin light coat of clear gel and place your stone/holo/charm.
    2. Make sure you are completely certain of the placement and positioning, then cure.
    3. Dab around the object(s) with clear gel and make sure you fill any spaces/cover any sharp edges of the charm, then cure.
    4. Apply a thin coat of gel over the deco, and cure.
    ** Some larger or slippery charms may be better applied with acrylic. Apply a layer of acrylic over the gel, place the charm, then cure. Steps 3-4.

    20120917-040109.jpg
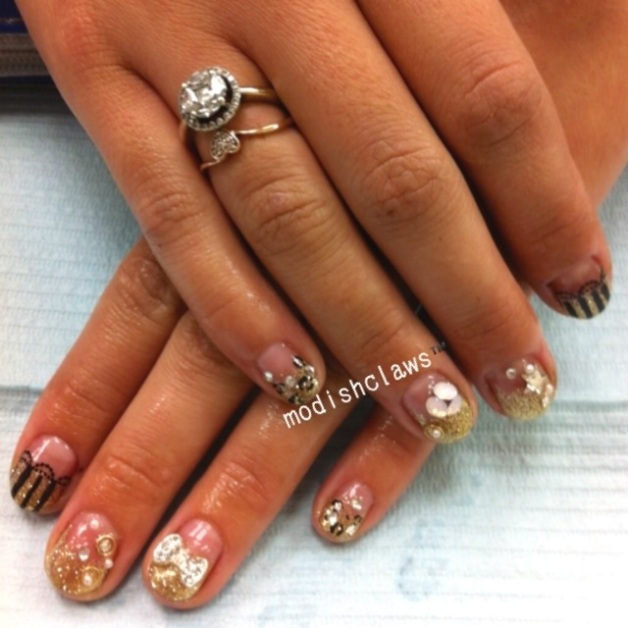
    My client was going to Las Vegas to celebrate her “Dirty Thirty”! She just wanted glitzy, unique, funky nails. Her birthday suit was a lacey black romper & gold accessories. So we incorporated lace and gold in her nail design to compliment her outfit. This is a natural nail overlay using Trump Gel, and glitter was Eriko. Stones are Swarovski.

    20120917-040120.jpg
    This is another natural nail overlay. The soft gel brand is CalGel, glitters were Eriko. Swarovski stones.

    20120917-040134.jpg
    Again, another natural nail overlay using CalGel (mixed #46 & #51), color gradation with clear Eriko glitter (#001) all over. This design is one of my favorites. It is subtle, but the accents with the stones and bullions give it some oomph. Stones are acrylic stones.

    20120917-042536.jpg
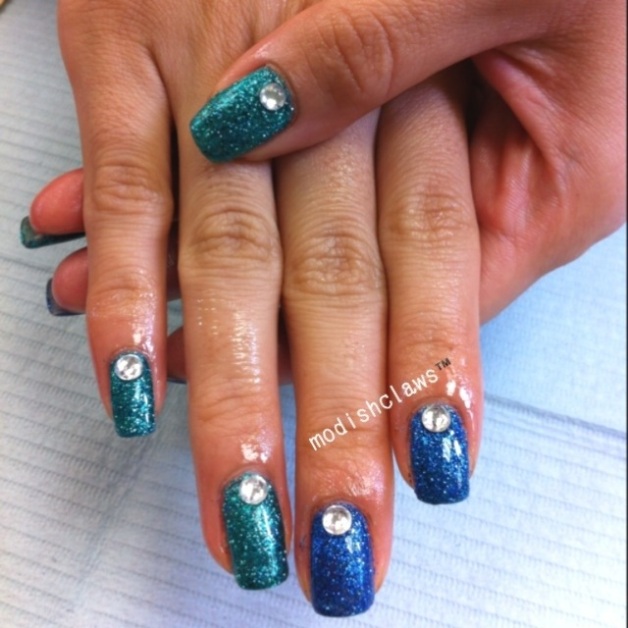
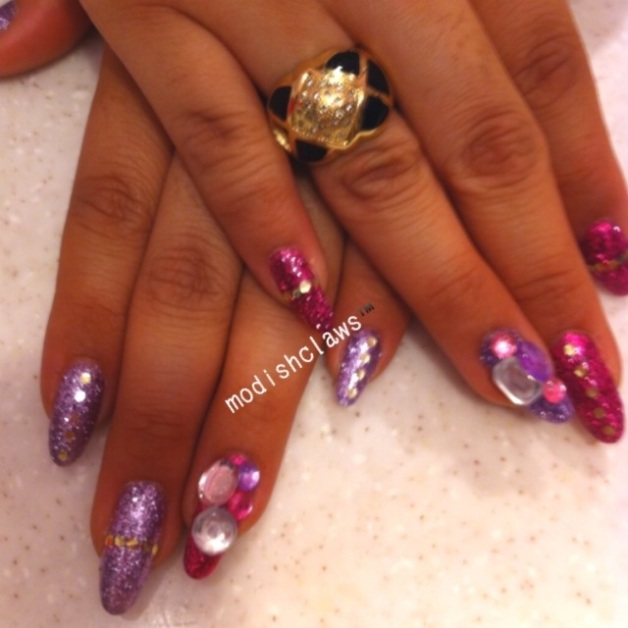
    This was done with just polish and glue. I love the color scheme and the way they shine. Most of the stones are acrylic stones. Some are Swarovski.

    20120917-042547.jpg
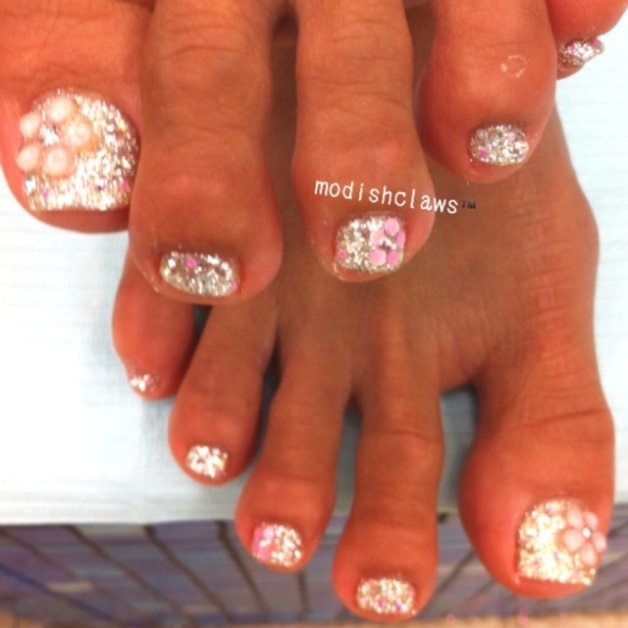
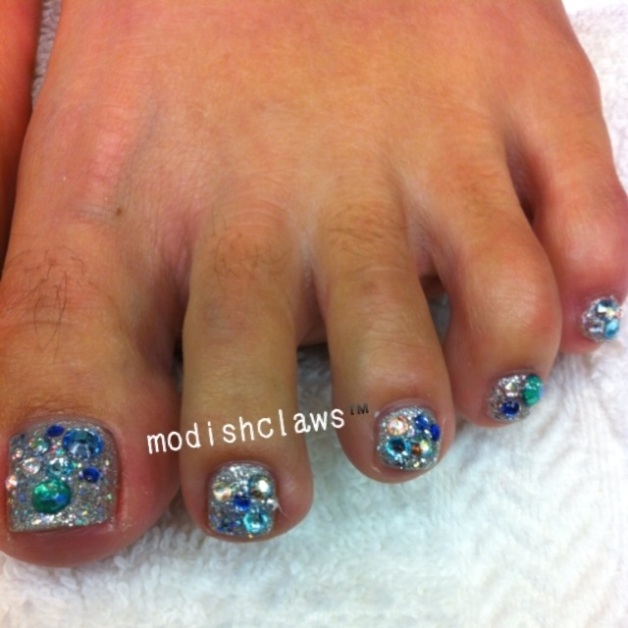
    This is a foot gel design. It is CalGel with Purnelle glitter. The flower on the big toes are charms, and the smaller ones, I made using holograms.

    20120917-042555.jpg
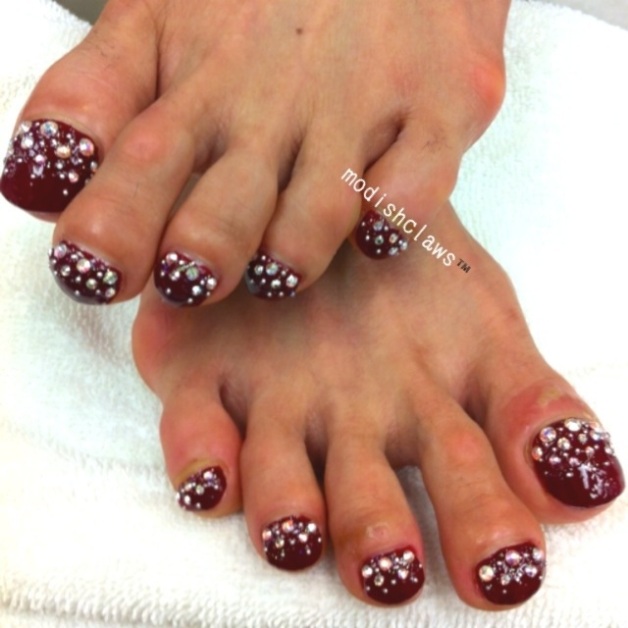
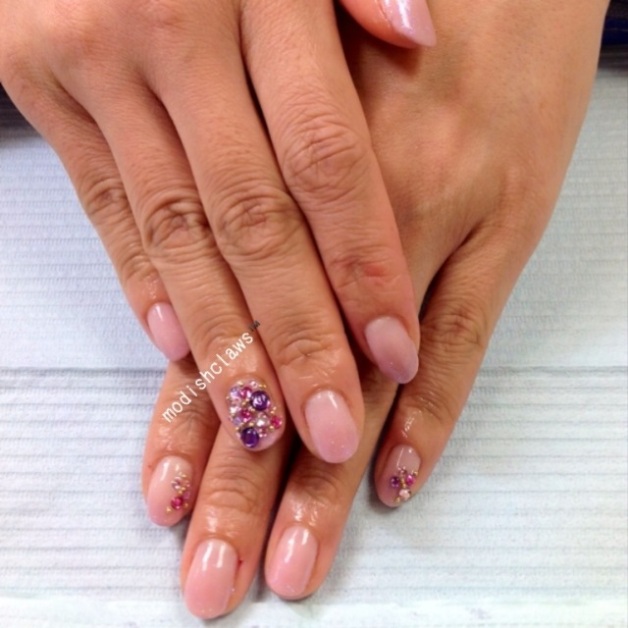
    This client is one of my favorites. She is the sweetest person ever. She told me that she always felt her toes and fingers were “beastly.” But after doing this very first design for her, she could not stop smiling, and came back to tell me she bought bunch of new open toes and had so many compliments on her toes! She wasn’t so self conscious anymore. This was done using polish and glue. The crystals are all Swarovski.

    20120917-132751.jpg
    Natural nail overlay with CalGel. Glitters came in a tower of like six colors from Claire’s. Stones are all acrylic; I bought them in a pack from Walmart. These are my nails.

    20120917-132805.jpg
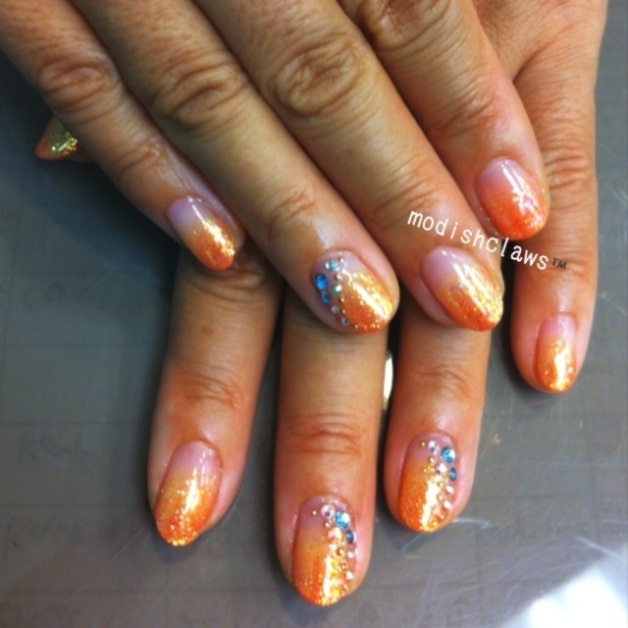
    My client wanted a “cool summer” look. Natural nail overlay using Trump Gel. Color gradation with Purnell glitter all over. I’m sorry, I can’t remember the color numbers. The stones are Swarovski.

    20120917-132812.jpg
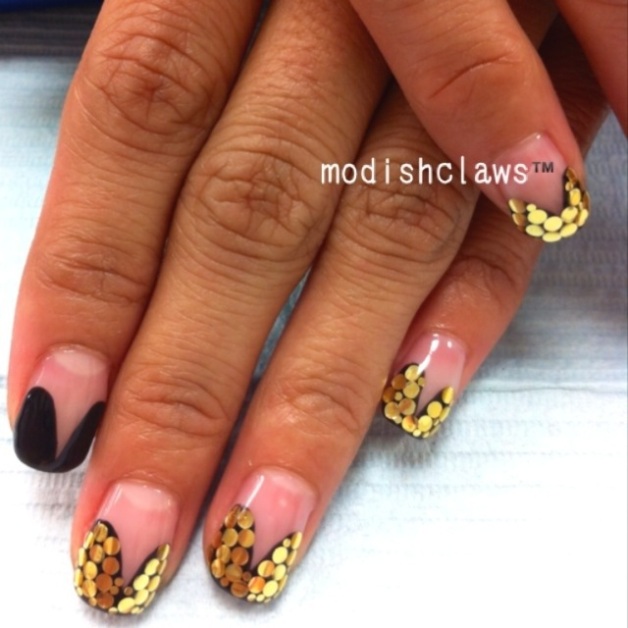
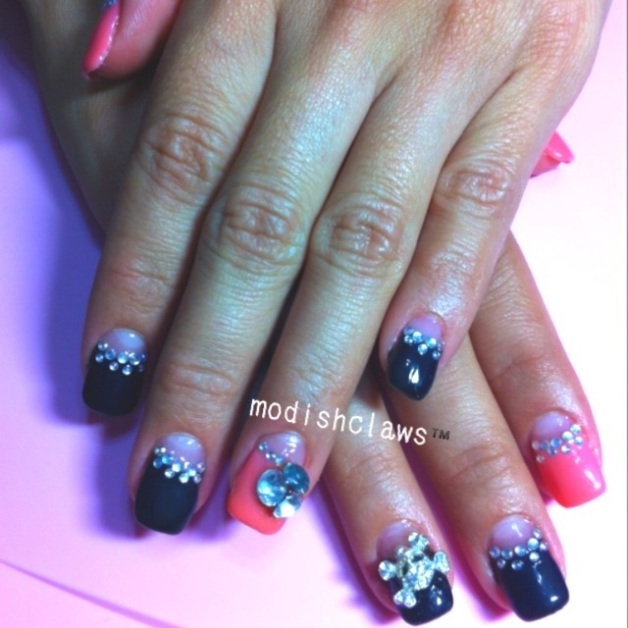
    Another natural nail overlay. Trump Gel Actually, this is a 2-week fill. The original design is all10 fingers with the black “heart” design. she came in for a fill and wanted to juste pump up the design a bit. We through some Eriko holograms on it.

    20120917-132818.jpg
    This is a tip & sculpture gel extension overlay using CalGel #05 & #04. For the sculpture, I used Bio Sculpture Gel. Deep French with acrylic stones, and charms from Korea. This is a girl who just loves the bling. She asked me to “go all out.”

    Which style is most you? How much bling is for you?
    Whatever it may be, keep in mind that it’s always in season for glitzy nails.
    Bling on!

    Thanks for visiting. Hope you enjoyed it. And remember, don’t forget to keep your claws modish!

    Xoxo,
    Stacia